Configuring user provisioning |
|
|
The user provisioning configuration is performed in two steps: first, it is necessary to configure SE Suite, to generate the security token and to configure the scheduling of the import of the provisioned users, and later, it is necessary to configure the provisioning in the Azure Active Directory platform.
See below how to perform each configuration:
SE Suite
1.To add a new configuration, in SE Suite, access SE Configuration
2.Enter a name for this configuration in the ID # field and save the information.
3.After saving, the configuration will be recorded in the system as enabled and with the security token generated. The values stored in the Secret token and Tenant URL fields will be necessary to configure the provisioning in Azure.
It is also possible to enter, in the Default access group field, a default access group for new users provisioned via SCIM.
Azure Active Directory
1.Access Azure Active Directory and locate and select the enterprise application in the enterprise application listing. In your enterprise application, in the side menu, select Provisioning and click on Get started to start the provisioning configuration.
2.In Provisioning Mode, select the Automatic option. In Admin Credentials, in the Tenant URL and Secret Token fields, enter the respective values from in the "Tenant URL" and "Secret token" fields configured in SE Configuration
3.After entering the fields, click on the Test connection button to test the connection and click on Save to save the configurations and enable the attribute mapping configurations.
4.Still in the provisioning configuration, access the attribute mapping information in Mappings and click on the Provision Azure Active Directory Groups link.
5.On the Azure group mapping configuration screen, select Enabled as "No" to disable group provisioning and click on the Save button. After returning to the provisioning configuration screen, user group provisioning should be disabled.
6.In the provisioning configuration screen, in Mappings, click on the Provision Azure Active Directory Users link to configure the attribute mappings of the provisioned users. It is necessary to keep Enabled with the value of “Yes” and, in Target Object Actions, select the options: Create, Update, Delete.
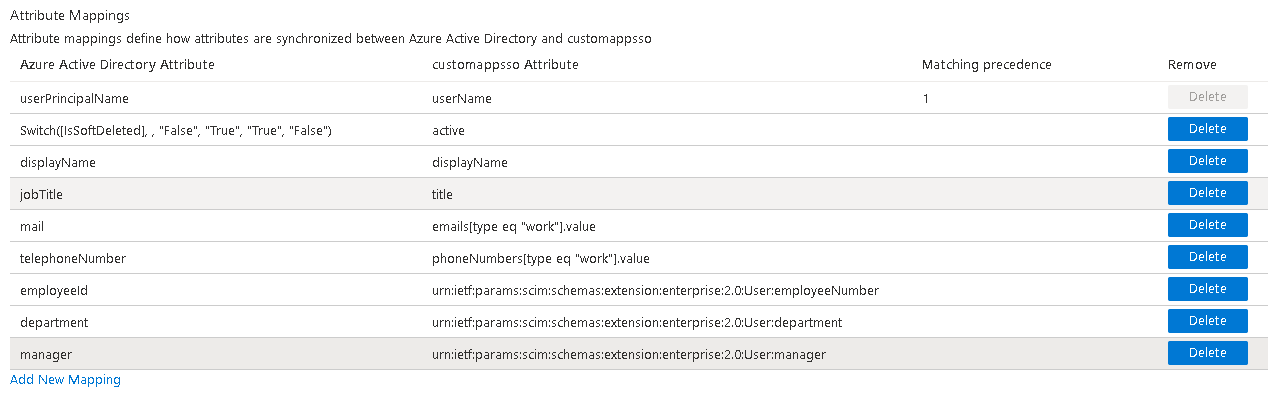
7.Still in the user attribute mapping configuration, the attributes highlighted in the image below must be deleted:
See below a table that maps the fields and attributes in the AD user record with the fields in the user record in the User (AD004) menu of the SE Administration component.
1 - The current user will be added as a subordinate in the leader user record. 2 - Field used as parameter to add the user under their organizational unit.
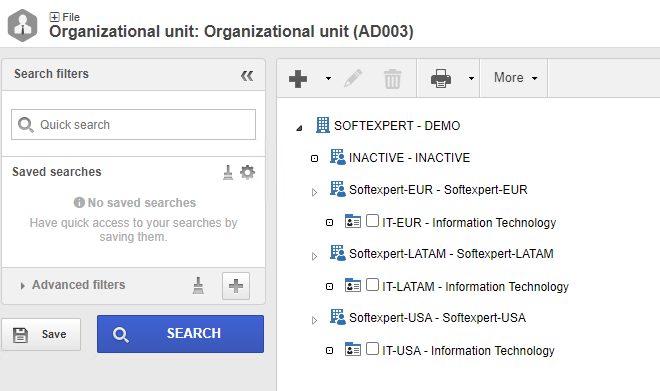
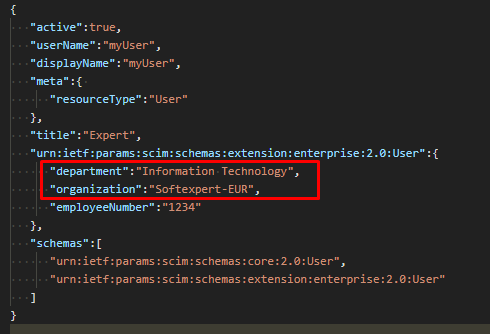
As shown in the example below, there are multiple departments with the same name (Information Technology), each with its own ID # and placed under its organizational unit. Using this new attribute, the system can map the departments and insert the user under the correct unit.
In the following case, the myUser user would be placed in the Information Technology department located under the Sofexpert-EUR organizational unit.
The user attribute mapping configuration must be equal to the image below:
|