PostgreSQL |
|
|
This section covers the procedures for creating and configuring the database for PostgreSQL DBMS. First, it will present the PostgreSQL and pgAdmin III installation procedures.
Installing PostgreSQL
To install PostgreSQL, follow the steps below:
1.Download PostgreSQL from the site: http://www.postgresql.org.
2.Execute the PostgreSQL installation file.
3.On the Welcome to the PostgreSQL Setup Wizard screen, click on Next.
4.In Installation Directory, choose a directory for the installation or keep the default path.
5.In Data Directory, enter the directory where the data will be stored. Click on Next.
6.Enter a password for the superuser of the database and the service account (postgre). Click on Next.
7.Enter the port where the service is listening on. Click on Next.
8.Use the default locale. Click on Next.
9.On the Read to install screen, click on Next.
10. Uncheck the Launch Stack Builder at exit option.
11. Click on Finish.
Installing pgAdmin III
To install pgAdmin III, execute the following steps:
12. Download pgAdmin III from the site: http://www.pgadmin.org/download.
13.Execute the installation file and follow the software instructions.
14. Open pgAdmin III.
15. Click on the Add a connection to a server button to add a connection to the database server.
16. In name, enter the connection name.
17.Enter the name of the database server host.
18. In Port, enter the PostgreSQL port. The default port is 5432.
19.Select the database for connection.
20. Enter the user name and password.
21. Click on OK.
Configuring the PostgreSQL network
This section covers the procedure to create and configure the database in PostgreSQL. To configure the PostgreSQL Network, execute the following steps:
22.Access the PostgreSQL directory that contains the configuration files. Example: C:\Program Files\PostgreSQL\8.x\data
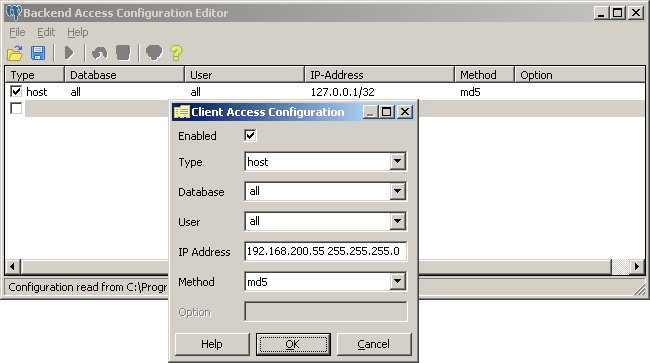
23. Open the pg_hba.conf configuration file for editing.
24. Locate the 'IPv4 local connections' configuration block and add a new line with the network data of the server where SoftExpert Suite is being installed:
25. The configuration of this file can also be performed by pgAdmin III (File
26.Save and close the configuration file.
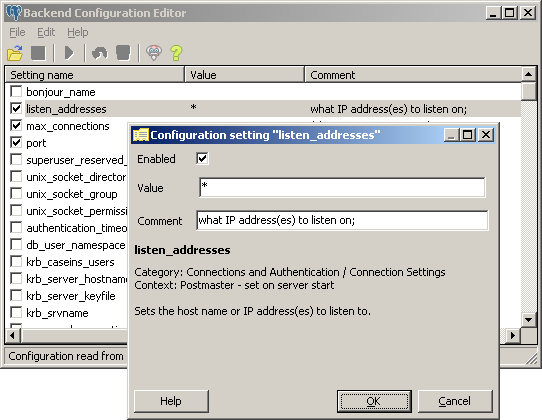
27. Open the postgresql.conf configuration file for editing:
28. Locate the listen_addresses parameter and change its value as shown below:
29. The configuration of this file can also be performed by pgAdmin III (File
30.Save and close the configuration file.
31. Restart the PostgreSQL service.
Creating the Tablespace folders
To create the Tablespace folders, execute the following steps:
32. Access the PostgreSQL directory where the folders will be created or use the PostgreSQL default Data folder. Example: C:\Program Files\PostgreSQL\8.x\data
33. In the selected directory, create a new folder named SOFTEXPERT_DATA. Example: C:\Program Files\PostgreSQL\8.x\data
34. In the selected directory, create a new folder named SOFTEXPERT_INDEXES. Example: C:\Program Files\PostgreSQL\8.x\data
35.Right-click on the upper-level folder. Example: C:\Program Files\PostgreSQL\8.x\data
36. Select Properties.
37. Select the Security tab.
38. Select the PostgreSQL service user.
39. Set Full Control permission in the Allow column for this user.
40. Click on OK.
Creating a user for SoftExpert Suite
To create a user, execute the following steps:
41. Open the pgAdmin III assistant.
42. On the left side, in the Object Browser menu, select the default server and connect to it.
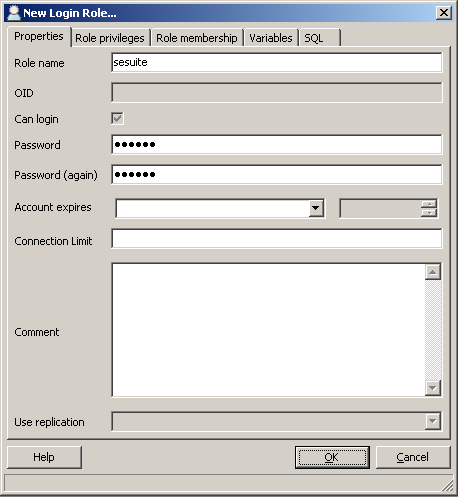
43. Right-click on Login Roles and select New Login Role.
44. On the New Login Role screen, on the screen that will be displayed, fill in the following fields:
▪Role name: Enter a name for the new user. ▪Password: Enter the password for the new user. ▪Password (again): Retype the password to confirm it. ▪Account expires: If necessary, enter an expiration date for the account being created.
45. Still on the user creation screen, access the Role privileges tab and select Superuser.
46. Click on OK.
Creating Tablespaces
To create a Tablespace, execute the following steps:
47. Right-click on Tablespaces.
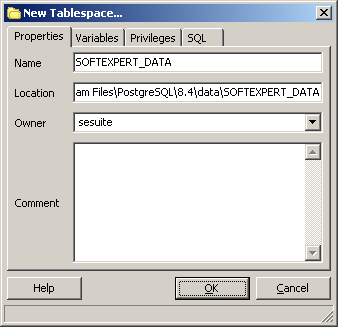
48. Select New Tablespace and fill out the following fields on the screen that will be displayed:
▪Name: Type SOFTEXPERT_DATA for the tablespace name. ▪Location: Enter the directory for the SOFTEXPERT_DATA tablespace folder. Example: C:\Program Files\PostgreSQL\8.x\data\SOFTEXPERT_DATA. ▪Owner: Select the user created for SoftExpert Suite. Example: sesuite.
49. Still on the tablespace creation screen, access the Privileges tab.
50. Select the CREATE option and click on Add/Change.
51. Click on OK.
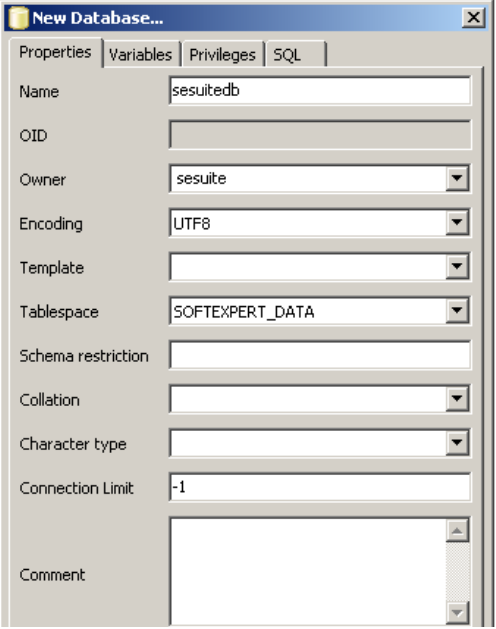
Creating databases
To create a database, execute the following steps:
52. Right-click on Databases.
53. Select New Database and, on the screen that will be opened, fill out the following fields:
▪Name: Enter a name for the database. ▪Owner: Select the user previously created for the SoftExpert Suite. ▪Encoding: Select UTF8. ▪Tablespace: Select SOFTEXPERT_DATA to be the default tablespace.
54. Still on the database creation screen, access the Privileges tab and select ALL.
55. Click on Add/Change.
56. Click on OK.
57. Close pgAdmin III. |